This page contains source code downloads (Arduino INO files) and HEX upgrade files.
SOURCE CODE DOWNLOADS
You can download the Arduino Source Code (sketches) for the shadescreen controller or the chopper driver. These are “INO” files contained inside the ZIP folders. Simply unzip them into your Arduino folder to modify and/or run them. See the appropriate section in the User Manuals to see what additional libraries are required to run these.
HEX FILE DOWNLOAD TO UPGRADE AUTOSHADE VERSION
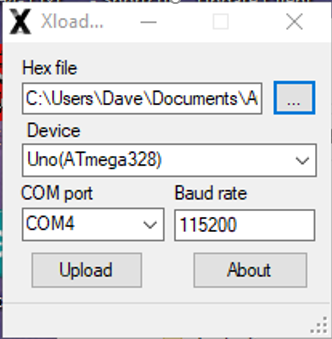
To upgrade the Autoshade controller software to the latest version V3.25, download the file XloaderV325.zip below and extract it to your Desktop folder. This will create a new folder called XloaderV325 which contains a number of files that will allow you to make the upgrade. Connect your PC to the Controller using a standard USB (tyoe A to B) cable. From the desktop, open the new folder XloaderV325 and double click the file marked Xloader.exe. This will execute a small loader program shown in the figure below. Select the hex file called MyShadesV325.ino.hex as the hex file, then select Uno(Atmega328) as the Device. Select the COM port which should appear when the Controller is connected with the USB cable and press Upload. After uploading, which should take a couple of seconds, the Controller will reset and display the new version number V3.25
It is best to upgrade when all the shades are in the UP position.
VERSION DESCRIPTIONS
Version 3.16 simplified the manual operation of the shade screens. Instead of selecting MAN, then UP or DOWN, then SEL, simply press MAN while in the normal RUN mode. If the shades are UP, the DOWN sequence will begin. Otherwise, the shades will begin to go UP. There is also an important bug fix that might effect the automatic raising of the shades following a power failure.
In Version 3.17 the UPTIMEOFFSET was increased to 8 hrs and the DNTIMEOFFSET was decreased -8 hours. Also the maximum SHADE#DOWN position was increased to 8 ft.
In Version 3.18 the SHADE#DOWN position was increased to 9 ft.
In Version 3.19, several bugs were corrected that affected the recovery after power failure of the shade screen positions and the time zone offset.
In Version 3.20 a new manual mode option was added that allows individual shades to be lowered or raised manually. The manual mode is selected by pressing PROG, then UP or DOWN until SHADES are selected. Now press PROG repeatedly through all of the shade program settings until SET MAN OPTION appears. There are two options which can be chosen by pressing the UP or DOWN arrows. When the correct manual mode option is displayed, select it by pressing the SEL button. The original manual mode option is called All. In this mode, all shades are raised or lowered sequentially when the MAN button is pressed. The second option is called Individual. Now when the MAN button is pressed, shade #1 is selected. Pressing the MAN button again selects shade #2, etc. When the shade you want to manually raise or lower is displayed, press the SEL button. If it is down, it will go up or if it is up, it will go down. The automatic time based control is not affected by which manual mode option is chosen. That is, all shades will raise or lower sequentially depending on the offsets programmed for UPTIMEOFFSET and DNTIMEOFFSET. If you only want to control the shades manually, set these two time offsets to be the same (typically to zero).
Version V3.21 fixed a bug in version 3.20 that prevented the timer from working correctly when the individual manual mode was selected.
Version V3.22 extended the maximum shade down position limit to 12 ft.
Version V3.23 prevented the shades from moving automatically when the 9V backup voltage is low.
Version V3.24 added a new manual mode called ADJUSTABLE and a menu to select the position resolution.
Version V3.25 revised the manual ADJUSTABLE mode so that the adjusted shade position is temporary. That is, after the shades are raised (manually or automatically) the down position that they will subsequently lower to is the one stored as ShadeDownPosition and not the one entered using the ADJUSTABLE command. Also, the minimum value for the uptime offset was changed from -1 to -8 hours.